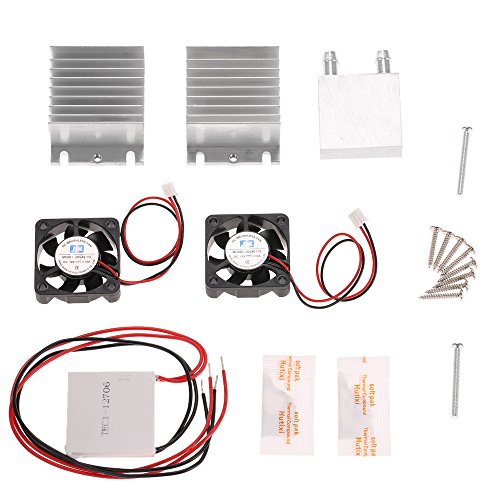
With the wide applications of semiconductor cooling, more and more DIY enthusiasts are interested in it. It’s a question that how to make refrigerating capacity to a more great extent in water cooling applications. This DIY kit could be just to your taste.
Features:
Adopt TEC1-12706 semiconductor chilling plate, good quality for use.
Complete sealed structure, isolating the moisture in the air.
Higher reliability than others.
Include 1*TEC1-12706, 1*conduction cool module, 1*water block, 1*fan, 1*thermal grease, 1*base board and a pack of screws.
Lightweight and mini in size, easy to install.
Great DIY kit for electronic enthusiasts in semiconductor cooling applications.
Note:
1. The conduction cool module can frost when the temperature is under -25°C.
2. TEC1-12706: one side with words is the refrigeration side, the other side is heat dissipation side.
3. Must install heat sink or water-cooled radiator on the heat dissipation side; otherwise will burn the Peltier.
4. The DC power is not included in this kit, please prepare it by yourself.
Specifications:
Semiconductor Chilling Plate: TEC1-12706
Size: 40 * 40 * 3.75mm
Internal Resistance: 2.1~2.4Ω
Max. Temperature Difference: 67°C Above
Rated Voltage: 12V(Vmax. 15V, Starting Current 5.8A)
Working Current: Imax.=4~4.6A(Rated 12V)
Refrigeration Power: Max. 50~60W
Working Environment: -55~83°C
Sealing Process: Standard 704 silicon rubber sealing all sides
Fan: DC 12V
Conduction Module Size: 60 * 45 * 21mm
Water Block Size: 40 * 40 * 12mm
Fan Size: 40 * 40 * 10mm
Package List:
1 * Conduction Module
1 * Water Block
1 * TEC1-12706
1 * Thermal Grease
1 * Fan
1 * Base Board
1 * Pack of Screws
Product Features
- Adopt TEC1-12706 semiconductor chilling plate, good quality for use.
- Complete sealed structure, isolating the moisture in the air.
- Higher reliability than others.
- Include 1*TEC1-12706, 1*conduction cool module, 1*water block, 1*fan, 1*thermal grease, 1*base board and a pack of screws.
- Lightweight and mini in size, easy to install.
Comments
Comments are disabled for this post.


Not happy I had to buy the holes, cooler liquid and radiator. It doesnt cool enough for a small cage im using. The heat over takes the cool. All it does it melts the ice and sweats. Even when i bought a separate fan for the radiator just run and doesnt even cool down. Wasted money cant get it back. So now i just have these sitting around. Waste of money. I would definitely would exchange this with the bigger fan and heatsink. Rather than the waterblock method.
Good starter and experimenter kit. All the parts to get started including thermal grease.No Assembly instructions, but assembly was easy. Nothing fragile. Small Phillips head screwdriver is the only tool needed.Fan could be bigger and more powerful. Ran everything on 12v at 3 amps from BMOUO 12V 30A DC power supply (Amazon, $20 )Felt plenty of cold or heat. Just loosen the screws and flip the TEC over. Never reverse voltage or current.Fan wires have connector, TEC 12706 does not have a connector. Just…
The TEC itself works fine at 12V 5A The TEC itself works fine at 12V 5A, however one thing wasn’t immediately clear to us which we feel we should point out:- The heat sink shown in the picture is for the cold side of the TEC only. The liquid heat exchanger side is the hot side. If you attempt to cool the liquid side, the heatsink and fan will overheat. They are not large enough to remove all of the heat. Even running at 2A, the heatsink is woefully undersized. -This is likely the cause of many of the negative…